Goでスクレイピングをためしてみた。
PuerkitoBio/goqueryを試してみたけれど、すごく簡単。 このブログにアクセスして、そこから各要素を一つだけ取得してみた。当然だけれど取得する要素はページ毎に調整する必要がある。手間がかかる部分。
簡単なサンプル gist.github.com
Swift xlibファイルを使ってViewを組み立ててみる。
いままでレイアウトは全てコードで書いてきたが、 複雑にレイアウトになった場合に、コード内のみとうしがかなり悪くなる。xlibでのレイアウトを試してみた。
その時の作業ログ

viewを新規作成

viewのOwnerを変更

UseXibVieクラスは先に作成しておく。

UINibでxibファイルを指定する
これでコードとxibが関連づけされる。
class UseXibView: UIViewController {
    override func loadView() {
        if let view = UINib(nibName: "SampleView", bundle: nil).instantiateWithOwner(self, options: nil).first as? UIView {
            self.view = view
        }
    }
}
Buttonを配置した場合
class UseXibView: UIViewController {
    @IBOutlet weak var Button: UILabel!
    override func loadView() {
        if let view = UINib(nibName: "SampleView", bundle: nil).instantiateWithOwner(self, options: nil).first as? UIView {
            self.view = view
            Button.text="chnageName";
        }
    }
}
weakに関しては、以下の記事が参考になった。 qiita.com
ちなみに、xibファイルの中身はこちら、
userLabel="File's Owner" customClass="UseXibView
上記の記述があるけれどこのファイルを移植すればそのまますんなりと流用できるのだろうか、それとも何か依存ファイルがあるのか、
<?xml version="1.0" encoding="UTF-8" standalone="no"?>
<document type="com.apple.InterfaceBuilder3.CocoaTouch.XIB" version="3.0" toolsVersion="10117" systemVersion="15G31" targetRuntime="iOS.CocoaTouch" propertyAccessControl="none" useAutolayout="YES" useTraitCollections="YES">
    <dependencies>
        <deployment identifier="iOS"/>
        <plugIn identifier="com.apple.InterfaceBuilder.IBCocoaTouchPlugin" version="10085"/>
    </dependencies>
    <objects>
        <placeholder placeholderIdentifier="IBFilesOwner" id="-1" userLabel="File's Owner" customClass="UseXibView" customModule="app" customModuleProvider="target">
            <connections>
                <outlet property="Button" destination="EOh-jw-9AA" id="fHZ-33-s40"/>
            </connections>
        </placeholder>
        <placeholder placeholderIdentifier="IBFirstResponder" id="-2" customClass="UIResponder"/>
        <view contentMode="scaleToFill" id="iN0-l3-epB">
            <rect key="frame" x="0.0" y="0.0" width="414" height="736"/>
            <autoresizingMask key="autoresizingMask" widthSizable="YES" heightSizable="YES"/>
            <subviews>
                <label opaque="NO" userInteractionEnabled="NO" alpha="0.80000000000000004" contentMode="center" horizontalHuggingPriority="251" verticalHuggingPriority="251" fixedFrame="YES" text="Buttom" textAlignment="center" lineBreakMode="tailTruncation" baselineAdjustment="alignBaselines" adjustsFontSizeToFit="NO" translatesAutoresizingMaskIntoConstraints="NO" id="EOh-jw-9AA">
                    <rect key="frame" x="130" y="357" width="144" height="22"/>
                    <fontDescription key="fontDescription" type="system" pointSize="17"/>
                    <color key="textColor" cocoaTouchSystemColor="darkTextColor"/>
                    <nil key="highlightedColor"/>
                    <color key="shadowColor" red="0.49803921579999999" green="0.49803921579999999" blue="0.49803921579999999" alpha="1" colorSpace="calibratedRGB"/>
                </label>
            </subviews>
            <color key="backgroundColor" white="1" alpha="1" colorSpace="custom" customColorSpace="calibratedWhite"/>
            <simulatedScreenMetrics key="simulatedDestinationMetrics" type="retina55"/>
        </view>
    </objects>
</document>
json.Marshalとjson.Unmarshal
Go言語でJsonの扱いがわからなかったのでしらべてみた。
ざっくりと言えば、
json.Marshal
構造体からJSON文字列へ変換
json.Unmarshal
JSON文字列から構造体へ変換
package main

import (
    "encoding/json"
    "fmt"
)

type MessageMarshal struct {
        Name string
    Body string `json:"body_json"`
        Time int64
}

type MessageUnmarshal struct {
    Name string
    Body string
    Time int64
}

func main() {

    //Marshal
    mm := MessageMarshal{"Alice", "Hello", 1294706395881547000}
    b, _ := json.Marshal(mm)
    fmt.Println(string(b))

    //Unmarshal
    c := []byte(`{"Name":"Alice","Body":"Hello","Time":1294706395881547000}`)
    var mu MessageUnmarshal
    json.Unmarshal(c, &mu)
    fmt.Println(mu.Name)
    fmt.Println(mu.Body)
    fmt.Println(mu.Time)

    //Interface
    var f interface{}
    json.Unmarshal(c, &f)
    fmt.Println(f)

}
{"Name":"Alice","body_json":"Hello","Time":1294706395881547000}
Alice
Hello
1294706395881547000
map[Name:Alice Body:Hello Time:1.294706395881547e+18]
Go言語でMySQLのtimestamp型の日付変換をしてみる
Go言語でMySQLのtimestamp型の日付変換をしてみた。
package main

import (
    "fmt"
    "time"
)

func main() {
    t, _ := time.Parse("2006-01-02 15:04:05.999999999 -0700 MST", "2016-08-15 01:15:57.065962927 +0900 JST")
    fmt.Println(t)
    fmt.Println(t.Format("2006-01-02T15:04:05Z07:00"))
    fmt.Println(t.Format("2006/01/02 15:04"))
    fmt.Println(t.Format("2006年01月02日 15時04分"))
    fmt.Println(t.Format("2006_01_02"))
}
結果は以下、
2016-08-15 01:15:57.065962927 +0900 JST
2016-08-15T01:15:57+09:00
2016/08/15 01:15
2016年08月15日 01時15分
2016_08_15
time.Parseの第一引数には定数が用意されている。定数にない場合は、自分で定義をする必要がある。
たとえばこんな感じに使える。
fmt.Println(time.Now().Format(time.ANSIC))

//2016-08-15T01:35:48+09:00
定数の一覧
const (
        ANSIC       = "Mon Jan _2 15:04:05 2006"
        UnixDate    = "Mon Jan _2 15:04:05 MST 2006"
        RubyDate    = "Mon Jan 02 15:04:05 -0700 2006"
        RFC822      = "02 Jan 06 15:04 MST"
        RFC822Z     = "02 Jan 06 15:04 -0700" // RFC822 with numeric zone
        RFC850      = "Monday, 02-Jan-06 15:04:05 MST"
        RFC1123     = "Mon, 02 Jan 2006 15:04:05 MST"
        RFC1123Z    = "Mon, 02 Jan 2006 15:04:05 -0700" // RFC1123 with numeric zone
        RFC3339     = "2006-01-02T15:04:05Z07:00"
        RFC3339Nano = "2006-01-02T15:04:05.999999999Z07:00"
        Kitchen     = "3:04PM"
        // Handy time stamps.
        Stamp      = "Jan _2 15:04:05"
        StampMilli = "Jan _2 15:04:05.000"
        StampMicro = "Jan _2 15:04:05.000000"
        StampNano  = "Jan _2 15:04:05.000000000"
)
SwiftからAlamofireを使う
Alamofireの作業ログ、何点かハマるポイントがあったのでその記録。
httpファイルにアクセスできない
https://以外のhttpのアクセスは制限されています。
App Transport Security has blocked a cleartext HTTP (http://) resource load since it is insecure. Temporary exceptions can be >configured via your app's Info.plist file.
NSAppTransportSecurityのkeyを追加する必要がありました。追加して無事OK。
<key>NSAppTransportSecurity</key>
    <dict>
        <key>NSAllowsArbitraryLoads</key>
        <true/>
    </dict>
localホストにアクセスできない。
Alamofireからlocalhostに接続できずにハマる。
stackoverflowにありました。 stackoverflow.com
要点としては、この記述ではアクセスできませんでした。
let url = "http://localhost:8080/"
以下のように変更してOK.
let url = "http://0.0.0.0:8080/post/1"
Test時には、expectationWithDescriptionを使う必要がある。
let expectation = expectationWithDescription("scync")
Go製サーバーをGoogleApp Engineに設置してみる&Google Cloud SQLの設定
GoのEchoで作ったサーバーをGoogleApp Engineに設置してみる。その時の作業ログ。
まずDBの作成
webサーバーをと思ったがまずはDBを作成する。
Google Cloud SQLとは?
Google Cloud SQL は、使いやすいフルマネージドの MySQL データベースです。Google Cloud SQL を使うと、パッチやアップデート、バックアップや複製の設定など、単調であるけれども必要で、時に時間のかかるタスクを Google に任せることができるようになります。MySQL のほぼすべての機能を持ち、あとで示すように追加機能や非サポート機能がいくつかあります。Google Cloud SQL は使いやすく、ほとんど全てのアプリケーションからアクセスできます。ソフトウェアのインストールやメンテナンスも不要です。
との事、AWSのRDSよりも安価に使えそうという事で今回選んだ、
比較記事はここを参考にさせていただいた。 qiita.com
Cloud SQL 第 2 世代(ベータ)は、分単位の従量課金制、自動の継続利用割引、予算にあったインスタンスを用意しています。利用していない>間は料金は発生せず、事前の申し込みなしで継続利用には割引が自動で適用されます。
料金は分単位の課金制となる、ここは実際に使ってみないと細かい部分までわかっていない。
Google Cloud SQLを設定する。

インスタンスを作成

第1世代を選択する

場所の設定

インスタンスが作成される、しばらく時間がかかる。

rootパスワードの変更は
アクセス制限 > ユーザー から実行できる。

timezoneの設定も管理画面からできる。MySQLフラグを追加

DB設定初期はパスワードが設定されていないので以下で接続できる。
mysql --host=<ip> --user=root
ユーザーのパスワードを設定した場合
mysql --host=<ip> --user=root --password
databaseを作成する。
CREATE DATABASE db_name;
ひとまず、DBの設定がここまでで完了する。
アプリの作成
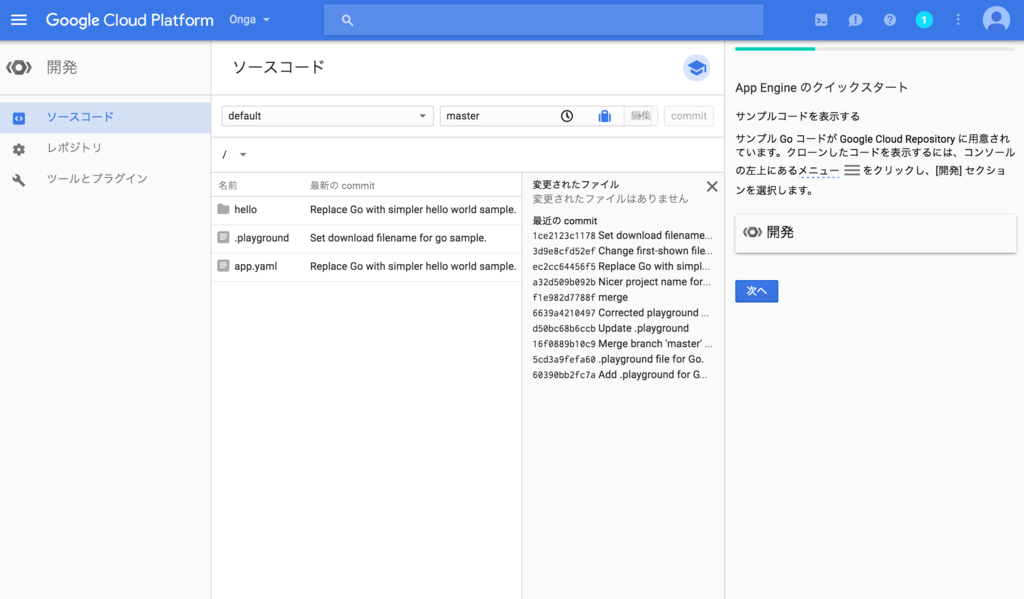
Goを選択します。

サンプルコードが表示されます。

Google App Engine SDK for Go
まず、Google App Engine SDK for Goをダウンロードする。
Download the Google App Engine SDK | App Engine Documentation | Google Cloud Platform
pathを通す
$ cp -R go_appengine ~/go_appengine/
$ export PATH=~/go_appengine:$PATH
Python 2.7がインストールされている事が必要らしい。
以下のコマンドで確認してみる。なければインストールが必要。
$ /usr/bin/env python -V

$ Python 2.7.10
バージョン確認
$ goapp version
$ go version go1.6.2 (appengine-1.9.40) darwin/amd64
ファイル構成
application: ********
の部分にプロジェクトIDを設定する。
Serveコマンド
ローカル環境でサービスを立ち上げる
goapp serve ./hello
Deployコマンド
本番環境にDeploy
goapp deploy ./hello/
Deployに失敗する場合
deploy最中に処理が落ちたりする場合に、以下のエラーが発生する事があります。
That user can undo the transaction with "appcfg rollback".
その時は、rollbackで解決
appcfg.py rollback ./app/
Error
突然、CloudSqlに接続できない現象が発生した。 原因としてはよくわかっていないのだが、Deployし直す事で解消した。
Cloud SQL connection error 2
stackoverflowにあった、どうも大量のコネクションが発生している事が原因らしい、ソースからdbへの接続方法が変更して対応。
I ran into similar issues using Go on App Engine with Cloud SQL that seemed to ?be related to the creating too many connections to the cloudsql instance. I changed my code to create a single connection to the db during init which I reused throughout the program and seems to work, similar to what is recommended here.
課題、
マイグレーションはどう行うのがいいのだろろうか?
The cloudsql package
Go言語からGORMとECHOでJSONを返すAPIサーバー作ってみる。
GORMとECHOでMYSQLのデータからJSONを返すシンプルなAPIサーバー作ってみる。 ECHOはシンプルな構成でサーバーを構築できる印象、使いやすい。ひとまずDBから取得したデータをJSON化して返す事ができました。
GORMの部分は前回作成したサンプルをAPIサーバー用にアレンジ。 onga-tec.hatenadiary.jp
ルーティングは以下のように指定できる。
func main() {
        fmt.Println("sever start")
        e := echo.New()
        u := userModel.User{}
        h := handler.CreateHandler(u)
        e.GET("/", status)
        e.GET("/user/:id", h.GetUser)
        e.POST("/user", h.CreateUser)
        e.DELETE("/user", h.DeleteUser)
        e.Run(standard.New(":3001"))
}
今回作成したサンプル、ところどころ修正が必要を感じる、、ここはおってベストプラクティスを探していこう。 gist.github.com
TEST
handler部分のtest
go test ./handler/ -v
model部分のtest
go test ./models/user/ -v
WEB
サーバー起動
go run app.go
以下のアドレスで確認できるはず。
http://127.0.0.1:3001/user/1
Goはtestが前提の設計がされているので、自然に無理なくtestを書く事ができるのは本当にいいところ、積極的にtestを書いていこう。
ちなみに、gopherって何の動物をモチーフにしているのだろうか、?きになる、、
